

- 類別 : [TMLDP] [System Administrator] [Advance ] [LAB]
- 主題 : 設定 GRUB 密碼
- 適用發行版 : RedHat 系列發行版 ( RHEL、CentOS、Fedora...)、Ubuntu
※尚未實測其他發行版
- LAB 環境 : CntOS 5.5
- 要進行這個測試你需要知道,
- GRUB 設定檔管理
- 如何使用 vi Text Editr 進行文字檔編輯
- 如何進行串流重導
- 相關主題 : [The GRUB Boot Loader] [Stream、Redirection、Filter and Pipes] [The vi Text Editor]
- 實驗要求 :
- 設定 GRUB 密碼為 PassWord
- 設定預設開機選項的密碼為PassWd
- 操作步驟 :
STEP 1. 使用grub-md5-crypt 命令產生 MD5加密密碼字串
[root@lab-2 ~]# grub-md5-crypt >> /boot/grub/grub.conf <<EOF
> PassWord
> PassWord
> EOF
stty: standard input: Inappropriate ioctl for device
stty: standard input: Inappropriate ioctl for device
[root@lab-2 ~]# grub-md5-crypt >> /boot/grub/grub.conf <<EOF
> PassWd
> PassWd
> EOF
stty: standard input: Inappropriate ioctl for device
stty: standard input: Inappropriate ioctl for device
[root@lab-2 ~]# cat /boot/grub/grub.conf | tail -6
Password:
Retype password:
$1$IrbRt/$k6kEGB8HK4bS8Q1TgIANu/
Password:
Retype password:
$1$bEcRt/$SSB74/27o5f0fnEONbjGW.
[root@lab-2 ~]#
STEP 2. 使用 vi 開啟 /boot/grub/grub.conf
[root@lab-2 ~]# vi /boot/grub/grub.conf
# NOTICE: You have a /boot partition. This means that
# all kernel and initrd paths are relative to /boot/, eg.
# root (hd0,0)
# kernel /vmlinuz-version ro root=/dev/hdb2
# initrd /initrd-version.img
#boot=/dev/hdb
default=0
timeout=5
splashimage=(hd0,0)/grub/splash.xpm.gz
hiddenmenu
title CentOS (2.6.18-194.26.1.el5)
root (hd0,0)
kernel /vmlinuz-2.6.18-194.26.1.el5 ro root=LABEL=/ rhgb quiet
initrd /initrd-2.6.18-194.26.1.el5.img
title CentOS (2.6.18-194.17.4.el5)
root (hd0,0)
kernel /vmlinuz-2.6.18-194.17.4.el5 ro root=LABEL=/ rhgb quiet
initrd /initrd-2.6.18-194.17.4.el5.img
title CentOS (2.6.18-194.el5)
root (hd0,0)
kernel /vmlinuz-2.6.18-194.el5 ro root=LABEL=/ rhgb quiet
initrd /initrd-2.6.18-194.el5.img
Password:
Retype password:
$1$IrbRt/$k6kEGB8HK4bS8Q1TgIANu/
Password:
Retype password:
$1$bEcRt/$SSB74/27o5f0fnEONbjGW.
STEP 3. 設定 GRUB 密碼為 PassWord
- #boot=/dev/hdbdefault=0timeout=5password --md5 $1$IrbRt/$k6kEGB8HK4bS8Q1TgIANu/ <--- 加這一行splashimage=(hd0,0)/grub/splash.xpm.gzhiddenmenu
STEP 4. 設定預設開機選項密碼為 PassWd
- hiddenmenutitle CentOS (2.6.18-194.26.1.el5)lock <-- 加上這一行跟下一行password --md5 $1$bEcRt/$SSB74/27o5f0fnEONbjGW.root (hd0,0)kernel /vmlinuz-2.6.18-194.26.1.el5 ro root=LABEL=/ rhgb quietinitrd /initrd-2.6.18-194.26.1.el5.img
※修改後的/boot/grub/grub.conf 內容
- # grub.conf generated by anaconda## Note that you do not have to rerun grub after making changes to this file# NOTICE: You have a /boot partition. This means that# all kernel and initrd paths are relative to /boot/, eg.# root (hd0,0)# kernel /vmlinuz-version ro root=/dev/hdb2# initrd /initrd-version.img#boot=/dev/hdbdefault=0timeout=5password --md5 $1$IrbRt/$k6kEGB8HK4bS8Q1TgIANu/splashimage=(hd0,0)/grub/splash.xpm.gzhiddenmenutitle CentOS (2.6.18-194.26.1.el5)lockpassword --md5 $1$bEcRt/$SSB74/27o5f0fnEONbjGW.root (hd0,0)kernel /vmlinuz-2.6.18-194.26.1.el5 ro root=LABEL=/ rhgb quietinitrd /initrd-2.6.18-194.26.1.el5.imgtitle CentOS (2.6.18-194.17.4.el5)root (hd0,0)kernel /vmlinuz-2.6.18-194.17.4.el5 ro root=LABEL=/ rhgb quietinitrd /initrd-2.6.18-194.17.4.el5.imgtitle CentOS (2.6.18-194.el5)root (hd0,0)kernel /vmlinuz-2.6.18-194.el5 ro root=LABEL=/ rhgb quietinitrd /initrd-2.6.18-194.el5.img
STEP 5. 存檔後重啟系統
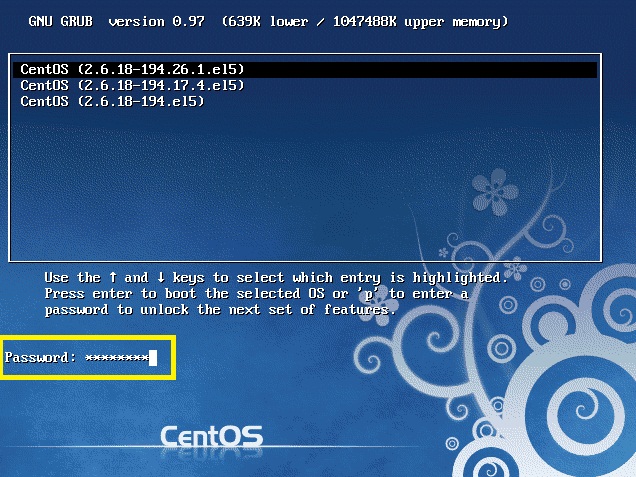
STEP 6. 驗證(一)
由於GRUB 已經設定了密碼保護,需先輸入 'p'

再輸入密碼後,才能進行其他作業

STEP 7. 驗證(二)

由於已經設定了GRUB 密碼,無法直接進入預設開機選項

需先輸入'p',再輸入GRUB 密碼

才能選取開機項目

故需再輸入個別開機選項密碼才能進行後續開機作業


